







Introduction
In many concrete companies, lab technicians still adjust mix designs and control production the old-fashioned way — by feel. Mix looks stiff? Add more admixture. Slump dropping fast? Pile on a higher dosage. It seems quick and easy, but it hides serious risks. A mix that flows nicely at discharge can later run into bleeding, aggregate settling at the bottom, segregation, excessive retardation, or even strength regression.
After years of hands-on lab work, here is the honest truth: every water reducer dosage has a fixed optimum saturation dosage — it is not a “more is stronger” product. Most mixes that are hard to adjust and unstable are not under-dosed; the real problem is that technicians cannot tell the boundary between conditions that call for admixture and conditions that call for a little water. Once you understand this article, you can leave guesswork behind for good and achieve precise admixture control, stable mix designs, and lower production costs.
Correcting the Biggest Lab Myth: More Admixture Is Not Better
Every polycarboxylate superplasticizer has a critical saturation dosage point. Within the saturation range, a higher dosage continuously improves flowability, coating ability, and workability. Once you push past the saturation point, however, every property deteriorates in reverse — extra admixture ruins the mix instead of improving it. Industry test data is clear: at the saturation dosage, PCE paste delivers its best flowability, mortar strength peaks, and shrinkage is minimized. Beyond that point, strength drops noticeably, drying shrinkage increases sharply, and stability collapses entirely.
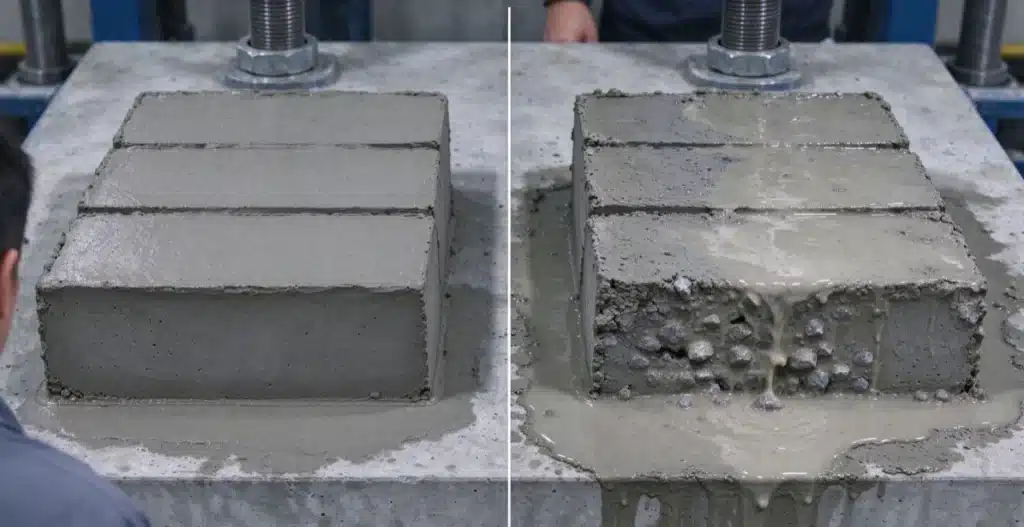
In plain field language: once the dosage reaches the critical point, the benefits have maxed out. Adding more will not buy you extra flowability — only extra quality risks. The most common lab quality defect caused by overdosing is a mix that looks normal at discharge but releases a layer of clear water on standing, with coarse aggregate sinking and compacting at the bottom and paste and aggregate separating.
In cold autumn and winter conditions, overdosing also stretches setting time dramatically: slabs stay unset for hours and formwork removal is delayed. The most insidious damage is 28-day strength regression and a much higher probability of later-age shrinkage cracking. Experienced lab veterans all agree: admixture should be dosed “just right,” never piled up blindly — even an extra 0.1% is unnecessary risk.
The Lab’s Core Boundary: When to Add Admixture, When to Add a Little Water
Add admixture — never add water — when:
- The binder shows heavy slump loss over time: normal at discharge, but stiffening quickly on standing, with flowability fading fast.
- The cement’s normal consistency has risen and the binder’s overall water demand has increased.
- Long-distance pumping or hot-weather production puts heavy pressure on slump retention and slump loss is too fast.
Core logic: when the water–binder ratio is correct and only flowability has faded, repair the mix with admixture alone.
Add a small amount of water — never more admixture — when:
- The admixture is already near the saturation point: extra dosage brings no improvement and will only cause bleeding.
- The paste is too viscous, with high internal friction, high pumping pressure, and heavy conveying resistance.
- The overall workability feels sticky rather than lean or dry — a viscosity problem, not a flowability problem.
Core logic: near the saturation point, a small water addition to cut viscosity is more stable, cheaper, and safer than overdosing on admixture.
Absolutely forbidden for water reducer dosage:
- Never add water on your own when the water–binder ratio is already at the design limit; the only correct moves are optimizing gradation, adjusting the sand ratio, or refining the binder system.
- Never apply a second dose of admixture after overdosing, and never try to rescue an over-dosed mix with water — scrap the mix design outright.
Seven Tricky Mix-Adjustment Scenarios: Precise Diagnosis + Standardized Corrections
1. A new binder batch swings admixture adsorption dramatically
Symptoms: at the same dosage, the mix made with the new binder batch runs dry and lacks flowability — or, switching to a low-water-demand binder triggers slight bleeding.
Root cause: cement mineral composition, fly ash fineness, loss on ignition (LOI), and slag powder activity directly determine how much admixture is adsorbed. High-LOI fly ash consumes large amounts of the active water-reducing components.
Fix: whenever the binder batch changes, redo the saturation-dosage trial mix. High-adsorption binders: raise the dosage modestly — run a paste adsorption test first, then a concrete trial mix. Low-adsorption binders: reduce the dosage proactively to prevent overdosing and segregation before they happen.
2. Aggregate shape and fines fluctuate, causing dosage drift
Symptoms: crushed stone with many angular edges, high flakiness, or manufactured sand with excessive stone powder or mud content — at the same dosage, the mix turns dry and harsh, coats poorly, and pumps at high pressure.
Root cause: rough aggregates and ultra-fine powders have a large specific surface area and adsorb admixture extremely strongly.
Fix: with rough aggregates or high fines, raise the dosage modestly while fine-tuning the sand ratio and paste volume — do not rely on admixture alone to cover for poor aggregates. With smooth, well-shaped, clean aggregates, adsorption is very low, so cut the dosage proactively and never over-apply.
3. Seasonal temperature swings shift admixture performance severely
Symptoms: in summer heat, slump loss is lightning-fast; in winter cold, the same dosage causes severe retardation and delayed setting.
Root cause: temperature changes the cement hydration rate as well as how admixture molecules adsorb and retain slump.
Fix: in hot weather, do not blindly raise the total dosage — increase the slump-retention component first. In cold weather, reduce the dosage and cut back retarder components to avoid the cold-weather over-dose retardation trap. Whenever the temperature swings by more than 5°C, re-verify the dosage with a fresh trial mix.
4. A sensitive saturation point: just 0.1% of dosage flips the mix
Symptoms: 0.1% short and the mix runs dry; 0.1% over and it bleeds. The critical window is razor-thin and production can swing wildly.
Fix: use trial mixes to pinpoint the saturation point precisely, then always produce slightly below the critical dosage with a safety buffer. Never run production right at the critical value — the slightest fluctuation in raw materials can wipe out an entire batch.
5. Bleeding and segregation: is it overdosing, or an unbalanced paste-to-aggregate ratio?
A high-frequency mistake: cutting the admixture every time bleeding appears — which often makes the mix harder to control, not easier.
How to tell them apart precisely: admixture overdose — the whole paste is too thin, clear water rises on standing, and segregation is general. Low sand ratio or large aggregate voids — excess paste fills unevenly, and segregation and bottom settling stay localized.
Fix: if the paste–aggregate balance is off, adjust the sand ratio and aggregate gradation first — not the admixture. If it truly is an overdose, reduce the dosage steadily while monitoring setting time.
6.Fast slump loss: never just stack on more dosage
The mistake: chasing slump retention by jacking up the initial dosage — smooth for the moment, but guaranteed overdosing problems later.
Fix: find the cause of the loss first: fast binder hydration, heat absorption by aggregates, or insufficient slump-retention components in the admixture. Adjust the admixture’s component structure before raising the total dosage, and solve time-dependent slump loss at its root.
7.Poor binder–admixture compatibility (the hardest hidden problem to trace)
Symptoms: the paste flow test looks normal, yet the concrete trial mix swings between good and bad and is extremely unstable.
Fix: run a paste compatibility screen first to isolate the cement / supplementary cementitious material / admixture mismatch. When compatibility is off, do not keep blindly re-trialing — work with the admixture supplier to adjust the formulation first, then re-establish the dosage.

Precision Admixture Control in the Lab: A Standardized Trial-Mix Procedure
- Whenever a raw material batch changes, run a paste test first to predict adsorption and compatibility.
- Use stepped (gradient) trial mixes to pinpoint the admixture’s saturation dosage precisely.
- Evaluate every trial mix on five indicators: flowability, coating ability, slump loss over time, bleeding condition, and setting time.
- After adjusting the sand ratio, aggregates, or binder proportions, always re-verify the appropriate dosage.
- For small production fluctuations, fine-tune in micro-steps — never make large parameter swings.
- Keep a saturation dosage log for every raw material batch, building a stable reference database.
The Lab’s Standard Adjustment Logic
- Mix is dry and stiff with heavy loss: add a small amount of admixture and re-mix.
- Mix is sticky with very high pumping resistance, near the saturation point: add a small amount of clean water to cut viscosity.
- Always stay pinned within the optimum dosage window — never overdose, never pile up dosage.
- Small adjustments first, to keep the mix design system absolutely stable.
Straight Talk from the Industry
True precision in admixture control does not rely on feel or on gambling with experience — it relies on judging the saturation point, distinguishing working conditions, and adjusting based on mechanism. Novice technicians only look at the slump number; seasoned technicians look at the balance of the whole system.
Admixture is only an adjustment lever — it can never make up for poor aggregate gradation, an unbalanced sand ratio, or a mismatched binder. Knowing when to add admixture, when to add water, and never overdosing is the core hard skill of lab technical staff. Control the saturation dosage and respect the boundaries between working conditions, and you will stabilize quality while cutting costs and boosting efficiency.